
Bulk-Create Invoices from Google Calendar
2026-05-24The Create from Calendar wizard turns Google Calendar events into invoices in four steps. Each unique event title becomes one invoice, and the number of occurrences becomes the quantity.
How Events Become Invoices
The wizard groups events by title and applies this logic:
- All events with the same title are grouped into one invoice.
- The number of appointments becomes the quantity.
- Events without titles and appointments you’ve declined are skipped.
- Recurring events are expanded — each occurrence counts separately.
- Buyer details (email, country, tax ID, language, last price) are pre-filled from previous invoices with that name.
Prerequisites
- A Haiku.lt account (free up to 500 invoices).
- A Google Calendar with appointments using consistent event titles — typically the client’s name.
- Google Calendar permission, granted when you sign in with Google.
Calendar contents are read temporarily during the wizard and never stored.
Step 1 — Open the Wizard
Click Create from Calendar on the dashboard. The four-step wizard opens.
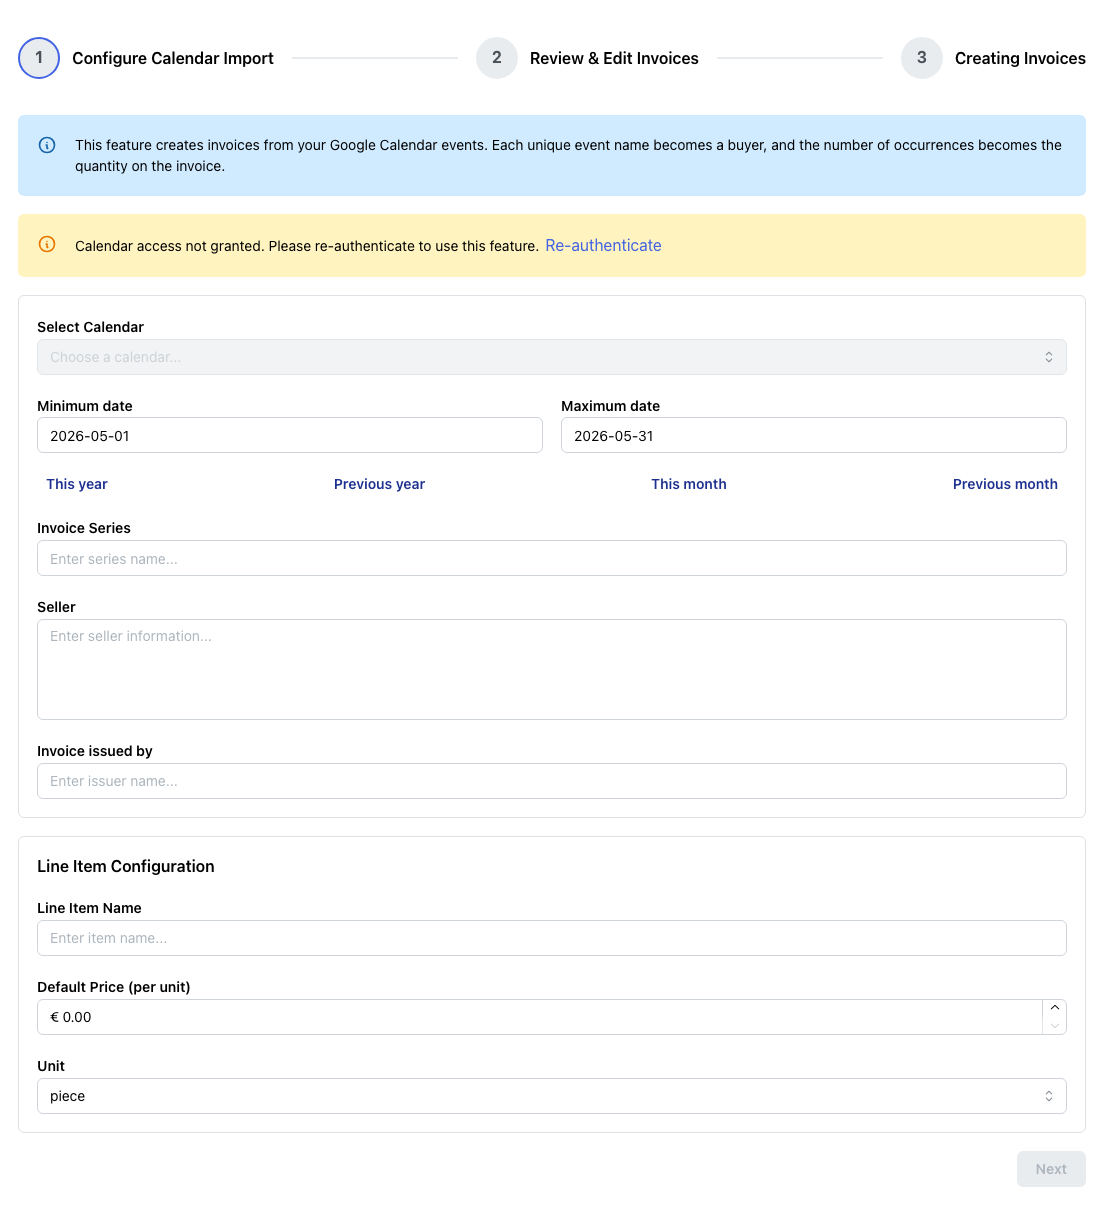
Step 2 — Configure the Import
| Field | What to enter |
|---|---|
| Calendar | Which Google Calendar to read from. Your primary calendar is marked “(Primary)”. |
| Date range | The period to invoice for. Defaults to the current month. The wizard shows a live count of events in that range. |
| Invoice series | The series code (e.g. THERAPY, COACHING). Suggestions come from your recent series. |
| Seller | Your seller block — auto-fills from your last invoice in this series. |
| Issuer | The person or role signing — also auto-fills. |
| Line item name | What you’re billing (e.g. “Therapy session”). Type to get suggestions from your history. |
| Default price | The standard rate. Used for any client without a prior price on file. |
| VAT % | Only shown if VAT is enabled in your settings. |
| Unit | “pieces” by default; “hours” or other units available from the dropdown. |
When the required fields are filled and the wizard finds at least one event, Next becomes active.
Step 3 — Review and Edit
A table appears with one row per unique event title. Every column is editable:
- Buyer name — the event title, edit if your calendar uses informal names.
- Quantity — number of appointments found.
- Email, country, tax ID — pre-filled from invoice history when available.
- Invoice language — 39 options; defaults to the buyer’s last-used language.
- Price — pre-filled from the last invoice for this buyer + line item combination; falls back to the default price.
You can:
- Remove a row to skip a client this run.
- Add a buyer manually with + Add Buyer (e.g. an off-calendar session).
- Adjust any cell to fix a one-off discrepancy.
When the table is correct, click Create N Invoices.
Step 4 — Creation and Results
A progress bar shows “Creating invoice X of Y…” as each invoice is generated. For most batches this takes well under two minutes.
The results screen reports:
- Succeeded — created invoices with series, number, and a View link.
- Failed — any rows that couldn’t be created, with the reason (validation, plan limit reached, etc.).
From here you can return to the dashboard, run the wizard again, or jump into Multi-Edit to send, save PDFs to Google Drive, lock, or mark paid in bulk — see Send invoices and save PDFs to Google Drive.
Tips
- Consistent event titles matter — “Marie Dubois” and “marie dubois” are different clients.
- Use a dedicated billable calendar so personal events don’t mix in.
- Decline events that shouldn’t be billed — declined events are auto-excluded.
- Run the wizard once per line item type if you bill different services at different rates (e.g. individual vs. group sessions).